I am really not that creative. (Shocker huh??) I can find stuff online and make them, although I always end up not following the directions fully and it doesn't turn out well. However, I am not that great at original creative type stuff. But this idea is pretty cool. I am sure I'm not the first one to think of it, but I didn't see it anywhere! I just made it. So here is my tutorial for a super easy reversible kid's cape!
You will need 1 yard of two different fabrics. Whatever colors your child would like a cape out of. And actually you need like 1 1/8 yard of one fabric to make the collar piece. Or you can just use a scarp of another fabric you have around. You will also need about an inch or two of Velcro. I chose blue and green to make a cape for Cheetah Boy.
First off sew the two fabric pieces right sides together. Be sure to leave an opening to turn it right side out. You know what I mean.
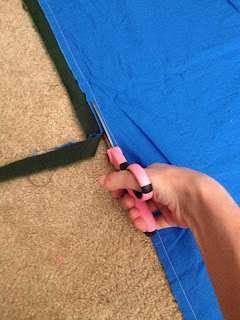
Unless you are a super perfect sewer you will want to cut off the extra fabric before you turn it right side out. And if you are like me your children will want to get in the way.... er help.
Next, turn it inside out! Lovely.
Iron the edges so they are all nice and flat. And actually my iron is broken, so it isn't even on in this picture, and I didn't iron mine. However, it will work nicer if you do.
Ok, now you want to sew around the edges. I think this is called top stitching? Maybe. I don't know, but hopefully you know what I mean. Make sure to fold under the hole where you had turned it right side out....
Once again, they children will help. Or start crying because it's lunch time and they are hungry (sigh).
If you are lucky though, you will walk upstairs and see that the 6 year old just took out the trash all on his own! What?!?! I have no idea, but it was pretty awesome.
Ok, after you have fed the children, put the little one down for a nap and turned on a movie for the older child, you can get back to work. You want to cut out a rectangle for the collar. I don't know how big, like 6 inches by 14 or something. Obviously, mine was not a very good cutting job.
You will want to fold the collar piece in half, right sides together and sew it, leaving the sides open. Next turn that right side out and iron it flat. Sorry, I forgot to take a picture of that part. Then you will want to lay the cape on the floor and find which side has the messiest sewing. You can cover that side up with the collar! Or you can base it one if you want the cape longer or wider. Whatever. I messed up here, so I will put the collar there.
Next you want to gather the side of the cape that will have the collar. I hate this part; it's difficult. And then fold the collar piece over the gathered spot. Gah, does that make sense?!?! You also want the collar piece to hang over about 1.5 inches past the cape on each side. Here you can see in the second picture.
You want it to hang over to put the Velcro on it there. Or I guess you don't have to! You do want to cover up all the messy gather part will the collar. So it's pretty... or handsome. Next, sew on the Velcro pieces on the overhanging collar pieces! I like Velcro better then using ties because it's easier for little kids, and then you don't have to worry about them accidently tying it too tight or something!!
Afterward make sure to clip your threads for cleaner sewing!!! (As my mom always told me in her mom voice when she tried to teach me to sew when I was younger.) And actually you are supposed to do this as you are sewing, not wait until the end, but I always wait until the end. My mom would be so disappointed in me. Not really, love you Mom!
It is all done. After giving it to your child, or grandchild, or maybe you made it for yourself, take some fun super-hero-or-whatever-they-wanna-be pictures!
They will probably ware it for about 5 minutes and then throw it on the floor. (sigh) But it was super easy right? Ok it SHOULD be easy, but I suck at giving directions huh? Sorry. And they will go back and play with it more! I promise.
There you have it! Also, you are not allowed to change anything about this pattern. You must do it exactly like I said. Or else.
Kidding, you could put like a letter on it or something! You will want to do that first, before you sew the sides together in the first step so you don't see the sewing on the other side. Or if you don't want it to be reversible then it doesn't really matter!!
Hope you liked it!!
Kisses~
What colors will yours be?
Please take the time to like my Facebook page
and/or follow my blog by email!!


No comments:
Post a Comment